


How to Install WordPress on GoDaddy (Linux hosting)
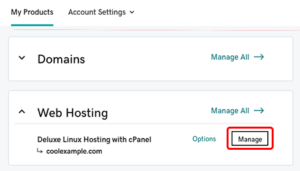
1) Sign in to your GoDaddy account and navigate to My Products.
2) Scroll down to Web Hosting and click the Manage button. If you have multiple websites and hosting accounts, then be sure to select the account where you want to install WordPress GoDaddy. This will take you to your account Dashboard page.
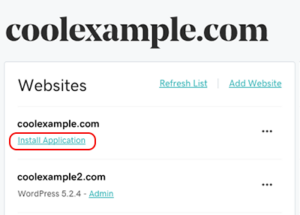
3) On your account Dashboard page, scroll down to the Websites section. Find the domain where you want to install WordPress on GoDaddy and click the link to Install Application. This will take you to the Applications Browser page.
4) On the Applications Browser page, scroll down to the Apps for Content Management section. Click WordPress blog, then click Install this application.
5) Configure the installation by completing the following fields:
- Location – Domain: Enter the domain where you wish to install WordPress on GoDaddy. If you prefer to use a subdomain, such as blog.xzydomainexample.com, you can enter it here. However, you’ll first need to add the subdomain to your account (under Web Hosting > Manage > cPanel Admin > Domains > Subdomains).
- Location – Directory: This field is optional. If you want your WordPress site to be located at your domain (and not in a directory), leave the field blank. If you want to use a directory, you can enter a name here. For example, if you enter the word “hello” here, the web address for your WordPress site will be xzydomainexample.com/hello.
- Version: In most cases, you won’t need to touch this section. GoDaddy recommends using all the default settings.
- Settings:
- The most important step here is to create your Administrator Username and Administrator Password. This will be your login info, which you’ll need every time you access your WordPress dashboard – so be sure to enter something you’ll remember and keep this information safe.
- On this page, you’ll also find several other settings options that you can configure the settings to meet your needs. However, GoDaddy has already selected most of the recommended options for you.
- Replace the field “Website Title” with the name of your site. You should also change “Website Tagline” to a brief, descriptive line that describes your website. Don’t worry – you can change this again later if you need to.
- GoDaddy recommends that you do not change the following default options when you first install WordPress GoDaddy hosting: Two-Factor Authentication, Limit Login Attempts, Enable Multi-Site.
- Advanced: Configure these settings to meet your needs, or skip if you don’t have a preference at this time. For most users, GoDaddy recommends selecting the option to “Automatically manage advanced settings for me.”
6) Click Install to complete the installation.
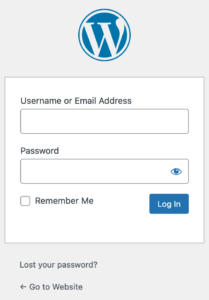
That’s it! That is how to install WordPress on GoDaddy. All you need to do now is sign in to WordPress by going to http://[your WordPress domain name]/wp-admin and entering the Username and Password that you created during the installation.
Steps to Install WordPress on GoDaddy if You Have Windows Hosting
The steps to install WordPress on GoDaddy for Windows Hosting are actually very similar to the Linux instructions; however, it involves a different management system.
Here’s how to do it:
1) Sign in to GoDaddy and go to My Products.
2) Scroll down to Web Hosting and click the Manage button.
3) On your account Dashboard page, click Plesk Admin.
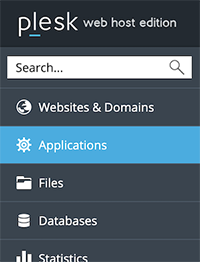
4) Click Applications on the left-side navigation, then click Feature Applications.
5) Find the option for WordPress, then click “Install.”
6) Configure your WordPress installation by following the same Settings steps outlined above for How to Install WordPress on GoDaddy (Linux hosting).
7) Click Install.